Tuesday, November 17, 2009

Install the AVG upgrade, and do it right!

Many of my customers use AVG Free for their anti-virus needs. If you use AVG as well, you should be seeing a strange pop-up saying you should upgrade.
Don't worry, this is legit, and you still won't have to pay for award winning anti-virus protection.

If you don't have this pop-up and want to UPGRADE, you can download it HERE. Then skip down to the install instructions below.

First, click on the big, red, "LEARN MORE AND UPGRADE NOW" button.

A new internet window should open and should look like this:

 HERE IS THE TRICK: You should scroll down the window and find at the bottom of the page the "Update my current product only" Link.
Click on the link and a new window will appear like this:

Scroll down the AVG anti-virus free column and click the download link.

Installation

Your computer should ask you if you want to run/open or save the program. You want to run or open it. If not, save it, and then run the program.


The following window should pop-up:

Click Next and a new window will follow:

Click "Install only basic free protection.", click next and a new window will appear:

Once the download is complete you will get:

Click the "I have read the licence agreement" and click accept.

Next, click Custom Installation and then click next.

Make sure the check boxes are checked and unchecked as shown above!


The program will continue to install:

Once completed, it will ask you how you would like to set up your scanning schedule. I recommend selecting "never." But why?!? Am I crazy? No, I just like to have control over when my computer starts scanning. If you feel the need to scan, do you when you'd like. AVG is always on in the background guarding your system, so you're protected!


AVG will ask you if you are sure, click yes.

Now a new window appears. UNCHECK "I agree to provide..." box, unless you would like AVG to receive info about viruses your computer found during scans.

Click Finish, and now it is time to restart your computer. Save any work that you may have also been doing, and restart your computer.

When you reboot your computer, you may get a pop-up that asks if you would like to "Optimize" your scan. Allow it to do so. It may take an hour to complete, and it shouldn't slow your computer down so you can do other things.

This tutorial should be a good guideline for future AVG upgrades. They happen about once a year.

Welcome to AVG 9 FREE!

Tuesday, June 9, 2009

Computer Repair Wisdom - IP address with No Internet

Through PC-Mat.com, I repair computers and electronics all - the - time. And even though I have been doing it for 10+ years, I seem to forget one of the most useful things I learned years ago.

When repairing computers, it is not always what you have, but the order in which you install it.

Here is a recent example:

I sometimes encounter strange errors after copying a customer's hard drive to a new, larger drive. This time I had an IP address, good DNS, can ping other network computers, but no Internet. I did all the usual fixes: Winsock2, lsp, NodeType: Hybrid, reinstall the driver, reinstall XP sp3, install IE8, sfc /scannow, netsh stuff and I'm sure more... all with no result.
So I was thinking about reinstalling XP... aaaaghhhhh... I HATE doing a reinstall...
Then, after watching Hancock thru Netflix instant streaming... I thought, "Oh yes... why don't I uninstall it from the system."
I used this method of troubleshooting as my first step for many years... before I knew "too much."
So I went to Device Manager, found the Broadcom network controller, right clicked on it, hit uninstall, and rebooted.
The computer booted up, found the "new" hardware device, and connected me right to the Internet... aaaaaaahhhh peanuts.... 6 hours of being "hardcore", and all I had to do was reinstall the device AFTER my OS reinstallation.

So what's the moral of the story?

It's not what you have, but the order in which you have it.

I'm sure there is some grand life meaning to that too, but more importantly it would have saved me about 6 hours of frustration...

Tuesday, May 26, 2009

Vista Service Pack 2, just what we need.

It turns out that Microsoft has just release Service Pack 2 (SP2) for Vista. Sure we didn't notice much after the first service pack, but this is the one we have been waiting for.

I have had NO problems with the update and I have seen a noticable improvment in Vista's performance!

You can get it HERE or download it through Windows Update.

Here is the list of fixes and upgrades:

-Slow shutdowns mostly resolved (we'll see)
-Wi-Fi dissconnect probelm resolved when started from sleep mode
-Blu-ray discs recording support
-Bluetooth v2.1 supported updated
-Vista Sidebar performance improved
-Power management efficiency increased by "10%"
-Support for VIA Technologies' new 64-bit CPU
-exFAT support
-Fixes almost "700" other nagging Vista issues! (Says Microsoft)

For more info visit the source HERE.

Sunday, May 24, 2009

Turn Vista into a Total Home Theater - The Easy Way!

Have you ever just wanted to sit back and watch some DVDs without getting out the whole stack of DVDs you have piled somewhere around the house? Wouldn't you like to fire up a device and choose from all your DVDs with just your remote? How would it sound if you could choose a movie from a list of 12,000? How about watching your favorite T.V. show you missed? We can do all that, and set up only takes a few minutes!

We are assuming you have the following:
1) A PC with Microsoft Vista
2) An Internet Connection with a Netflix account
3) A DVD drive and/or a Blu-ray drive with Blu-ray player software

What we will get with this easy made media theater:
1) Netflix - Stream 12,000+ movies
2) Hulu - Stream television shows and movies that you love
3) Personal Video Collection - Store and play all your DVDs, Blu-rays and home videos

Windows Vista comes with Windows Media Player (VMC). We will use this as the foundation to make our quick and easy media theater. To access the VMC, click on the start button and type "media center" into the search bar and push enter.


1) Netflix

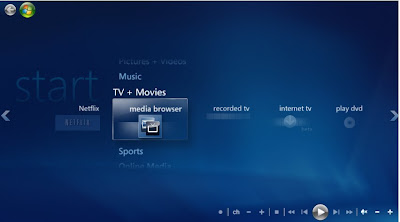
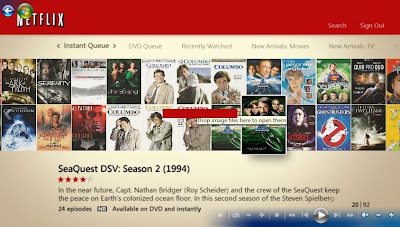
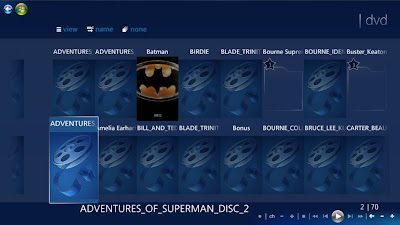
Microsoft just released a VMC update that includes Netflix. Once VMC is loaded, you will see a Netflix icon to the left of the recorded tv icon (See Image Above). Click on the icon and enter in the necessary information and you're set. You may have to update your computer because Netflix uses Microsoft Sliverlight, but once that is done, you should be able to watch videos right away!


2) Hulu
There is not an official Hulu streaming program like for Netflix, so we will have to try a couple of different programs. Each program will work for both 32 and 64 bit versions of Vista.

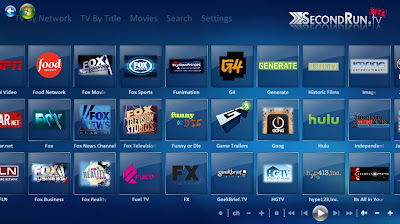
The first program is called Secondrun.tv. This is a good program with a nice interface that separates the videos by channels. You can download the video HERE.


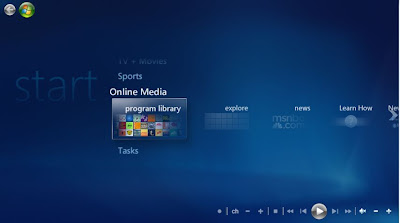
After installing this program, you can run it by going to the "Online Media" section and clicking on the program library icon in VMC and finally on the SR icon.


The second option is called TunerFree MCE. This program provides more than just Hulu, but it's interface isn't as clean as Secondrun.tv's but it does work. You may find it to better suit your entertainment needs. You can download it HERE.

3) Personal Video Collection

I'm sure you'll agree with me that having a case full of DVDs is cumbersome and not ideal. VMC will read DVD files as if it is the actual disk, but how do we get those files to the hard drive?

AnyDVD HD from Slysoft is my first choice. The is not a free program, but since we are also talking about Blu-ray movies, then this is the program to get. You will not find a free Blu-ray program, and AnyDVD HD is a simple and reliable solution. You can download AnyDVD HD HERE and try it for free (since you're there download Virtual Clone Drive as well). Run AnyDVD HD and insert a disk to rip. The tray icon will tell you that it is scanning the disk. Right click on the tray icon and select the Rip to Hard Disk or Rip to Image (.iso) option. But which should you choose?
For simplicity, rip all DVDs and Blu-rays as an image.
Please NOTE:
It is recommended to rip DVDs to Hard Disk than to an image. There are a few reasons for this, but the main one is VMC will "see" the DVD files as a disk and will NOT "see" the image (.iso) files at all under the VMC DVD library. Don't worry, if you do rip all your DVDs as images, we will be able to see our DVDs using another program... Media Browser... but first...

Virtual Clone Drive will load your image files as if you took a DVD from your collection and put it in the DVD drive. The program will act like a new DVD drive for all your virtual disks (image files). So you don't ever have to get a disk out and use up a DVD drive on your computer; it's all virtual. You can download Virtual Clone Drive HERE.

Media Browser (2.0.11.0) is in beta, but it's highly recommended you use this beta and NOT the stable version (Video Browser 1.3.2.0). The two versions are NOTHING alike. You can download Media Browser Here.

IMPORTANT: After you install Media Browser, it will ask you to add your video file locations in the Configuration Wizard. Add your video file locations and then change the location of the Daemon Tools to the Virtual Clone Drive location.
For example: Click Advanced Playback, Change Location and find Daemon.exe at
C:\Program Files\Elaborate Bytes\VirtualCloneDrive\Daemon.exe
Now run Media Broswer by opening VMC and going to program library and selecting the Media Browser icon. It will do an initial set up and the default options will work.

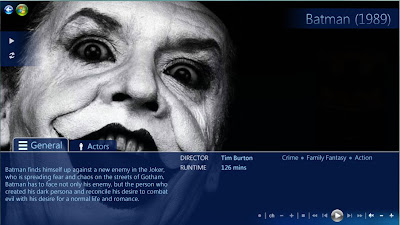
If everything set up correctly you will be able to see all your Blu-ray and DVDs in the Media Browser program and play them right from the menu! How convenient is that!


So in review:

1) Netflix - Built in, just enter in your info.
2) Hulu - Try these two programs:
3) Personal Dvd/Blu-ray Library - Load in this order:
4) Get off the couch once-in-awhile!

Wednesday, May 13, 2009

Turning Your GMail Email Account into Online Storage!

Google's mail service, or GMail, has become a large entity in the free email service department. The days of using Yahoo or Hotmail are almost gone. A majority of my friends have switched over to GMail and deactivated their Hotmail accounts. It's always nice to centralize your online needs in one location and google seems to be good at it. However, who do you know has actually used up all that email storage space that GMail offers? Currently I am using .025 GB out of 7.3 GB of email storage space. That is essentially a 7 GB flash drive begging to be used!

Though this is NOT an official Google program, it is extremely handy when you need your files on the go, wherever you go (online).

So here is how you use your space:

I was going to have some nice pictures showing exactly how to do this, but it is really an easy install!

1) Create a new email account for your online GMail hard drive.
Example: your-regular-email-name-and.drive@gmail.com

2) Download (Save) the program here: DOWNLOAD

3) Unzip and run the program. You may have to reboot your machine.

4) Go to My Computer and Open your GMail drive.

5) Enter your user name, password and check auto log in. You can always change that later.

6) Now drag and drop a file and watch your new online hard drive take action like action has never been taken before!... <---- What? Congratulations! You can now use your 7 GB of online storage space! This is great for group work projects or even for files that you just have to have anywhere you go (with Internet of course)!

Here are some words of caution before you journey into this dark and wondrous forest:

1) Though gmailfs may work now, GMail may disable this feature in the future. You can always download your files as attachments from your GMail account if needed. Before you do all that troublesome pointing and clicking, look for a new version of gmailfs online; they may have fixed the problem.

2) Try not to put personal files that can be used for identity theft on your GMail Drive.

3) Always copy the file from your GMail Drive before editing them! If you do not, you may lose the file in your Temp folder... never to be seen again...

4) Your file size limit is about 10 MB (similar to attachments), but it can vary.

5) Do NOT make folders in folders in folders! You can't make your file directory structure too large! One MAYBE two folders within a folder is as far as you want to go, otherwise it won't work.

6) You cannot Rename your files from the GMail Drive, but you can do "everything else."

You have been warned!!! Woo ha ha!

Enjoy!

Friday, May 8, 2009

The Case of the Missing Laptop

About one month ago, my dad purchased a Gateway T-6345U. The description and price looked good, so I told him to get it:

Operating System: Windows Vista Home Premium
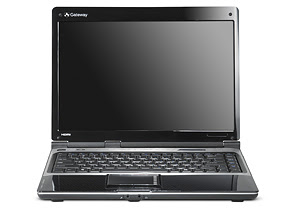
CPU Type: Intel Pentium dual-core T3400(2.16GHz)
Screen: 14.1" WXGA
Memory Size: 2GB DDR2
Hard Disk: 250GB
CPU Type: Intel Pentium dual-core
CPU Speed: T3400(2.16GHz)
CPU FSB: 667MHz
CPU L2 Cache: 1MB
Screen Size: 14.1"
Resolution: 1280 x 800
Card Reader
5-in-1 Digital Media Card Reader
Battery: 6-cell lithium ion


According to Newegg, they offered it for $399 with free shipping! That's even a better deal!
So what's the catch? Well... it is a Gateway. I have not been a Gateway fan, so I wasn't about to expect much from the laptop. So the laptop came in, and WOW! $399 bought this brand new, wonderfully designed laptop?

I was so impressed, I was going to buy this laptop for some customers who were also looking to buy a laptop for under $500. So I went back to Newegg and it showed it was sold out! What! I just read numerous blog posting advertising this great deal the day before:

For example: http://www.dealdetectives.com/index.php?b=7141

So I scoured the Internet looking for the same great deal, annnnnnnnnnd nothing. I looked for about a week and still nothing!

I went back to Newegg only to find the same laptop is now offered for $500 WITHOUT free shipping! Personally, I think the computer is worth about $550, and that is what Newegg claims its original price is. What is the actual price? I checked on Gateway's site, and again NOTHING but a "coming soon" sign! Correction: There are prices for the Models now, but not when I did the research. The prices shown on Gateway.com are cheaper than prices you can actually find it for.
So what happened to the laptop? What happened to this great deal?

It turns out that Gateway will sneak in good deals like this not only to Newegg, but also to other retailers like QVC or the Home Shopping Network! So let's find the next great Gateway deal!

Poof! The T-1424U!

http://www.tigerdirect.com/applications/SearchTools/item-details.asp?EdpNo=4545380&Sku=G180-14100

Tada! There it is. With a little bit of work, we have the "next" great Gateway deal. Sure, it isn't $399 shipped. However, it is cheaper than the newly priced Newegg Gateway AND it is shipped for about $2!

The laptop designs are exactly identical. The new model is red and has a light grey keyboard. The light grey keyboard is wonderful for low light typing because it reflects the screen light really well. It also includes a HDMI out port! This is a biggy! That means it will easily output to your television in High Def! You can watch all your Netflix or Hulu movies from your PC to your TV! Amazing. That is totally worth the extra $80 from the old Newegg deal. It also includes a bigger hard drive, a built in Webcam, and more RAM! Whaaaaat!!!?!!! Now it is a definite steal! What's the con? It has an AMD processor. This is a bummer because AMD processors are known to run hot; running hot is less efficient and will consume more battery power. So we'll just have to keep it plugged in.

Here are the specs:
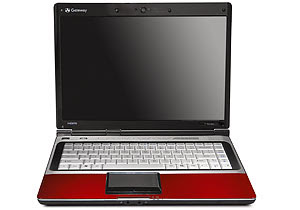
WXGA Ultrabright TFT
Screen Size: 14.1"
Maximum Resolution: 1280 x 800
Memory Size: 3GB
Memory Speed: DDR2 667
Hard Drive Capacity: 320GB

Operating Systems: Windows Vista Home Premium
Processor Class: Athlon 64 X2 Dual-Core 1.90Ghz
Processor Cache: 512KB
ATI Radeon X1270
Video Memory: 256MB of HyperMemory
Video Interface: HDMI, VGA
Media Reader Capacity: 5-in-1

Battery Type: 6-Cell Lithium-ion

So the biggest bummer is the processor. It also has a smaller cache size. We'll just have to see how the laptop performs for ourselves!

Wow! Again, another winner. Hmmmmmm, I just might have to reconsider my position on Gateway computers (laptops at least). It ran just like the other computer, but it had an excellent HDMI out that works wonderfully!

In both instances, the Gateway laptop came with little bloatware! It booted up fast and was ready to go. Very impressive Gateway!

Some words of caution with Gateway:

1) Many people complain about Gateway customer service.
2) Many people complain that it is difficult to get Gateway to honor their warranty.
3) If the laptop is cheap, it could be using cheaper than "usual" parts.

Neither I nor my customers have had problems with Gateway (laptops), so I highly recommend purchasing these great deals!

Friday, May 1, 2009

Virus on a NEW MP3 or USB stick?!?


Recently, I went out and bought my wife a nice little mp3 player. I bought a Green, 2GB iVO-Sound m220 Clip On MP3 Player, and it was only $20 from Microcenter.

After making the purchase, I went home and started to set up the new player. As soon as I plugged it in, my AVG anti-virus popped up to tell me I have a Trojan... ahhh, what? I just bought this thing!

It turns out this is NOT unique to iVO-Sound (Bay Consumer Inc.) products, but to ANY similar product made in a foreign country. In most cases, it comes from China. A worker will put a Trojan set to install when windows autoruns the new MP3 player. It does this by accessing an autorun.inf file that was placed there by said evildoer. If successful, this Trojan can be used for various purposes, such as identity theft. Bummer.

"So what exactly happened?"

As soon as I plugged in the MP3 player, AVG says it has detected Trojan horse PSW.Agent.YOM.

"So what, just delete the file..."

That's where this virus gets tricky! Windows Explorer loads the start.exe (the Trojan) as a CDROM drive! You can't just delete a CDROM... sneaky sneaky... So what can we do about it?

Never fear "Panda USB and AutoRun Vaccine" is here! Simply go to:

http://research.pandasecurity.com/archive/Panda-USB-and-AutoRun-Vaccine.aspx

and select the USB drive letter... and.... vaccinate! That's it. Even though that should work, we still have to make sure.

Next download Autorun Eater:

and run it. It will make sure the autorun.inf bad guys won't cause any more harm.

Finally, scan your new MP3 player and computer with your anti-virus program. This should double check that all is clear. If Autorun Eater doesn't find anything when you are done with your virus scan, feel free to uninstall it.

Now it is time to put some songs on that neat, green thingy so my wife can use it... now that it will no longer compromise my network security.

Friday, April 24, 2009

Recent News To Note: AMD Phenom II X4 955 Unleashed!

Records are being smashed with AMD's New Phenom II X4 955! It has been overclocked to 6.5GHz while being supercooled by a liquid nitrogen cooling system.

AMD might be in the run again with this new processor with a significant performance increase over previous AMD chips and against competing Intel products. Benchmarks show greater performance for the X4 955 ($245), than Intel’s new Core 920 i7 ($289) in photo filtering, slideshow rendering and gaming.

Read more HERE.

Set Up Gmail As Your Default Mail Application (MAC or PC)

Have you ever clicked on a "contact us" link and your Microsoft mail application starts up only to tell you that you haven't set up your email account. That is probably because you don't use Microsoft. Shortly thereafter you think, "Aaagh, I wish gmail will just load." Well here is how to do that (on a MAC or PC)!

First follow this link and download the Gmail Notifer...
I know, now you're thinking there is going to be another start up program in your tray... but don't worry, we'll fix that.

Next, run the program and uncheck the "Run on startup" box:


Then enter your password:


Finally, right click the mail icon at the bottom right-hand corner of your screen and click exit:

That is it! Now go find all the Mailto: links you can find and be amazed!

Note: The gmail app will log on to whoever used gmail last. So if you have more than one gmail account, make sure you are sending it from the right account! This can be done by visiting mail.google.com and noting what account shows up.

For Mac users it is very similar:

1) Download the Google Notifier and run it.
2) Go to Preferences by Click the Mail icon on the Menu bar
3) Select the Gmail tab
4)Uncheck the "Start on Login" and "Display Message Count" option, and choose Gmail as the program from the "Default Email Program" drop-down menu.
5) Enjoy the convenience of Gmail as your default app!